
Quick answer: The correct house renovation order follows a simple rule: work from the inside out, and from the messiest jobs to the cleanest. Electricians always come before plasterers. First fix services (running cables and pipes) happen before walls are sealed. Second fix (fitting sockets and finishing) happens after plaster has fully dried.
Ignoring the correct order for house renovation can be a costly mistake. This is something that homeowners need to understand, whether you’ve got a full home renovation project going on, are a just updating one room.
If you started with the plasterer who leaves your walls smooth, clean, and freshly painted, you’ll be disappointed when an electrician has to drill through the plaster to run new cable routes. Depending on the scale of the work, this mistake can cost upward of £1,000 to essentially re-do the finish to the same standard.
This isn’t an unusual story. Renovation sequencing errors like this happen regularly, and they almost always come down to the same problem: trades being called in at the wrong time. Getting your house renovation order wrong doesn’t just slow the project down; it multiplies costs and causes quality problems that follow you for years.
The rule is straightforward: work from the inside out, and from the messiest jobs to the cleanest. Every decision about sequence should protect the work that comes after it.
This guide focuses specifically on where electrical work fits within the broader renovation order of works—one of the most commonly misunderstood parts of any project. You’ll also get the full house renovation timeline from planning through to final snagging, plus a breakdown of the most expensive sequencing mistakes to avoid.
Step 1: Planning and Design — Where the Sequence Begins
No physical work should begin until layouts are finalised. That means floor plans, structural calculations where required, and any necessary building regulations approvals. Getting regulatory sign-off before breaking ground protects you legally and avoids costly mid-project rethinks.
This means liaising with your chosen trade companies and talking them through your plans so that they can give their expert input and a give you a quote. At this point there might be some back and forth where your plan changes either due to budget restrictions, or expert opinion either improving your plans or flagging any potential issues with it.
Your electrician will be helpful to discuss the lighting design of your home, as well as audiovisual installation, home security systems and more. Ensure you pick an experienced electrician who can guide you on the lighting choices for each room, so that they are fit for their intended use and have the right ambiance.
Build-in Ample Lead Time for Materials
Once you’ve got your tradespeople locked in and quotes have been agreed, you’re ready for the fun part: choosing and ordering materials, fixtures and fittings.
One planning step that homeowners consistently underestimate is lead times. Kitchens, bathrooms, custom windows, and bi-fold doors can take 8 to 12 weeks to arrive. Order them late, and you’ll have tradespeople standing idle on your budget. A thorough renovation plan maps out your room-by-room schedule from day one, not as you go.
Renovation costs are much easier to control when the sequence is planned in advance. Unplanned decisions mid-project, such as moving a socket, repositioning a radiator, or widening a doorway, carry a premium.
Step 2: Strip Out and Demolition
Once the plan is locked, strip out begins. This phase involves removing old kitchens and bathrooms, lifting flooring, taking down ceilings if needed, and removing walls that have been scheduled for demolition.
Critically, old wiring and plumbing are also removed at this stage if they are being replaced. This is the right time to begin rewiring or replumbing, not after walls have been rebuilt. Demolition must always precede any new structural or service work.
Step 3: Structural Work
Extensions, steel beams (RSJs), new load-bearing walls, roof alterations, and the installation of new windows and external doors all fall under structural work. Every one of these alterations must be completed before trades like electricians and plumbers begin their work.
The reason is straightforward: cable runs and pipework need to follow the final layout of the building. If a steel beam shifts a ceiling height or a new wall changes a room’s footprint, the first fix services need to account for that. Building regulations often apply to structural changes, and sign-off may be required before the next phase begins.
Step 4: First Fix Services, Where Your Electricians Come In
This is the phase that causes the most confusion—and the most expensive mistakes.
Do electricians come before plasterers? Yes. Always. With very few exceptions, which we’ll cover in a moment.
First fix electrics involve running electrical cables through walls and ceilings, chasing walls for cable runs where surface routing isn’t possible, installing back boxes for sockets and switches, and routing data cables. At this stage, walls and ceilings are still open. That’s the point. Certified electricians need access to the building’s structure before surfaces are sealed.
In parallel, first fix plumbing involves running pipework and heating pipes, along with any ventilation ducting required.
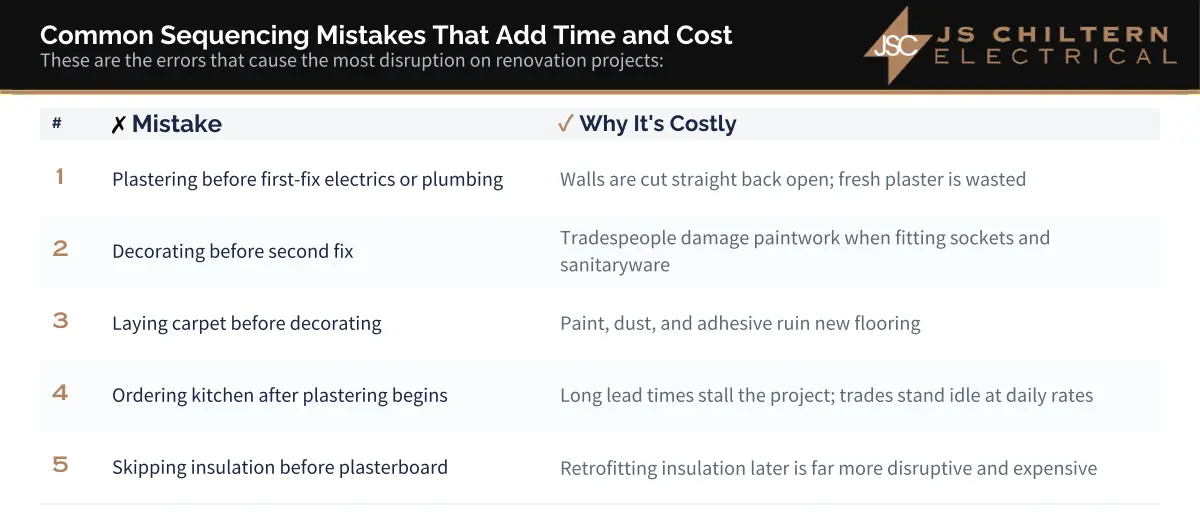
Plastering before first-fix electrics is one of the most expensive mistakes a homeowner can make. Once walls are skimmed, accessing cable routes means cutting straight back through fresh plaster. The cost isn’t just the re-plaster. It’s the disruption, the repainting, and the delay to every subsequent trade.
First fix electrics and plumbing happen at the same time, if both are needed. Both trades need open walls, and coordinating them together keeps the project on schedule.
The Only Time Plastering Might come Before Electrics
When might you get a plasterer in before the electrician and plumber? The toxic substance asbestos can be found in textured ceilings, more commonly known as Artex. If you know or suspect that your ceilings or walls may contain asbestos then this can be remedied by skimming or overboarding the surface before the electrician drills or cuts into it, keeping all the toxic dust behind that barrier.
Electricians are used to working with textured ceilings and would be able to advise you on whether this is a bridge you need to cross. If your light fittings and sockets are not moving then there’s probably no need to disturb the ceiling at all, and you can follow the standard first fix electrics before plastering rule.
Step 5: Insulation
With cables and pipes in place and cavities accessible, insulation goes in before plasterboard seals everything up. This includes stud wall insulation, loft insulation where applicable, and acoustic insulation between rooms—particularly useful in multi-storey properties.
This step is often skipped or rushed, but retrofitting insulation later is far more disruptive and expensive than fitting it at the right point in the sequence.
Step 6: Plasterboard and Plastering (Skim Coat)
Plasterboarding covers new ceilings, stud walls, and any boxing-in of pipes or structural elements. Once the boards are up, the plasterer applies the skim coat—the thin finish layer that creates the smooth surface all subsequent trades will work on.
When should you plaster after electrics? Only after all cables, pipes, and back boxes are fully installed, confirmed, and inspected. Not before.
Once plastered, allow the skim coat to dry fully before moving on. In a fully plastered room, this typically takes four to six weeks. Whereas a skim coat can take 3 to 7 days. Rushing this stage causes second fix problems such as sockets that don’t sit flush, moisture in walls, and paint adhesion failures.
Step 7: Second Fix Carpentry
Once the plaster is fully dry, second fix carpentry begins. This covers internal doors and frames, skirting boards, architraves, window boards, and stair components. Carpenters need clean, unobstructed walls and floors to work accurately—so this step happens before the electrician and plumber return for their second fix.
Step 8: First Fix vs Second Fix Electrics and Plumbing — The Finishing Phase
Second fix electrics involve fitting sockets and light switches, installing light fittings, and connecting all electrical outlets back to the consumer unit. Second fix plumbing covers connecting the boiler, fitting radiators, and installing sanitaryware like toilets, basins, baths, and taps.
First fix vs second fix is one of the most useful distinctions in renovation sequencing:
First fix = running and hiding the services inside the structure
Second fix = connecting and finishing those services once surfaces are complete
Understanding this distinction alone will prevent the most disruptive and costly sequencing errors in any home renovation project.
Step 9: Kitchen Installation
Kitchens are installed before the electrician and plumber make their final connections. Units need to be in situ so tradespeople can connect appliances, under-cabinet lighting, extractor fans, and plumbing precisely where required.
This is why ordering the kitchen during the planning phase is so important. A delayed kitchen delivery after plastering has begun is one of the main causes of budget overruns in residential renovation projects. Trades stand idle. Day rates accumulate. The knock-on effect ripples through every remaining step.
Step 10: Decorating
Decorating begins with a mist coat, which is a diluted emulsion applied to fresh plaster that seals the surface and prepares it for full coats of paint. Jumping straight to standard emulsion on new plaster causes flaking and poor adhesion.
After the mist coat, the process follows a logical sequence: fill and sand imperfections, paint ceilings and walls, and hang wallpaper if that’s your finish of choice.
Decorating must happen before flooring (with the exception of tiling) and before final fittings. Paint drips and dust from decorating will damage finished floors and freshly fitted sanitaryware.
Step 11: Flooring
Flooring sequencing depends on the material:
Carpet is almost always the last thing installed after all other trades have finished.
Hardwood and LVT typically go down after decorating is complete.
Bathroom tiling is done before sanitaryware is fitted, so tiles run cleanly under and behind the bath, toilet, and basin.
Screed (for underfloor heating or floor levelling) is an earlier step, done after first fix plumbing if underfloor heating is being installed.
Step 12: Final Finishes and Snagging
Final finishes include mirrors, shelving, curtain poles, towel rails, and silicone sealing around baths and basins. These are the last elements to go in before the renovation is signed off.
Snagging is a structured final walkthrough. A methodical review of the entire project to identify and document any incomplete or substandard work. A thorough snag list protects you as the homeowner. It gives every trade a clear record of what needs to be rectified before final payment is released.
Snagging isn’t just for large builds. Even a single-room renovation benefits from a documented checklist before the project closes.
A Real-World Example: Renovating a Living Room
Here’s how the renovation order of works plays out in a single room:
- Remove the old fireplace and lift the existing flooring
- Chase walls for new socket positions
- Electrician runs new cables — first fix electrics
- Plasterboard any new or altered walls
- Plaster the room — skim coat applied
- Allow plaster to dry fully (four to six weeks)
- Mist coat and paint the ceiling and walls
- Carpenter fits skirting boards and architraves
- Electrician fits sockets and lights — second fix electrics
- Lay flooring
- Install furniture and final accessories
Every step protects the one that follows. That’s the principle the entire sequence is built on.